plumrose


Saturday 30 March 2013

50th Guest Signing Book


I wanted my Mom and Dad to have something special for their Guest Signing Book. Those typical ugly old books just wouldn't do.
 
So after weeks of gathering photos, designer paper, embellishments, and hand made flowers, glued, glittered, embossed and binded, it's finally done. And signed in too. Silly me forgot to take photos of it before that.
 
I didn't anticipate people signing with so much to say. I figured they'd just sign their name, maybe a congrats and that's all. Guess it just proves that over the years Mom and Dad are loved and have a fantastic group of friends and family with lots of well wishes.
 
In the end there still wasn't enough space for everyone to sign, so I improvised and just cut up some recipe sized cards. They can be place in the envelope I made in the back of the album.


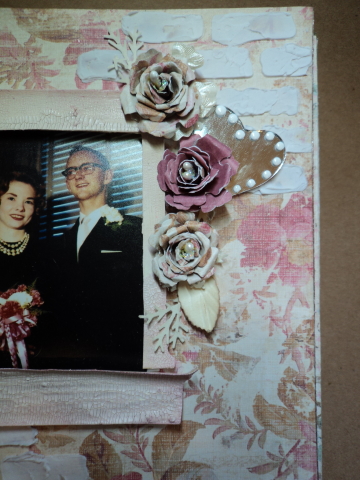
Wanting to emphasis the window they are standing in front of, I used the brick stencil and some modeling paste, here and there on the cover. A window frame die from Memory Box Window/Sill Die, I painted it with a soft pink crackle paint from Ranger to give it a weathered look.
 
Lots of flowers cut with Tim Holtz Tattered Floral Die.
Stamen centers.
Martha Stewart edge punch, and leaf punch.
A mirrored heart, dotted with
Heart Lace Ribbon.
Ribbon
 
The remainder of the pages have heat embossed embellishments, stamps,  flowers, die cut flowers, gems, inked edges.....


This page opens up to reveil another photo and sentiment.


 This is what's inside this envelope: Filmstrip made using the Bind it All that also punches the holes for the binding! Photos on both sides.


I made the cake from an embossing folder, and cut to resemble a cake. The carnations are hand painted and cut out. The cake topper is an actual photo of the cake topper originally on their cake 50 years ago.


 Hand Painted roses and a computer generated sentiment on velum and cut out using an oval die frame, heart ribbon lines the bottom.
 
 Gold, heat embossed stamps


Half the page opens up:

 Stamped sentiment, Tim Holtz Tattered Floral die cut.
 
 
                                                         Premade plaster? flower


Lots of pages to write on: Pewter swam charms


I printed off a couple of photocopies of the telegrams Dad sent Mom when they were apart for school, made an envelope, all mini sized of it's original.
 
This page also opens up to reveal a photo of my Mom's parent, on their own 50th Anniversary!


This is what's inside the envelope


 Inside back , it says, Enjoy the Journey (Tim Holtz Stamp) and back cover says.... To Be Continued....

I think my next project should be to make one of those photo box's so I can get some decent photos of my works!


Challenge: Simon Says Stamp : Anything Goes


Thursday 28 March 2013

Chipboard Bunnies

I found these chipboard bunnies at my Dollorama. Originally green, I painted the purple one.
The eggs, the fence and all flowers are cut using the cricut machine.
Embellishments with the Viva Pen and  gems.
The sentiment I found at Michael's. I taped up, inked, stamped and heat embossed separately the two words, to stack them rather than it all across one line.
Brazil ? paper for the background.


This purple heart (altho they're hard to see) flower is also chipboard, from dollarama. It's a nicer purple than what's photographed.


Here's what I mean about the stamp!


Wednesday 27 March 2013

Retired Pastor

 
Spellbinders square die
stamped and embossed Bible
computer generated sentiment as dictated by my client
hand painted roses, cut out and dot glued for dimension
brick embossing folder for the background
Thanks to Karen at Word Art Wednesday for inviting me to join in the fun
 
Challenge: Simon Says Stamp: Anything Goes
Word Art Wednesday - Anything Goes

Monday 25 March 2013

50Th Key chains

Mom and Dad didn't want any cards, or gifts for their 50th Anniversary. But who really listens the that, right??? But I do understand their request, after all, she's been clearing house, giving things away, minimizing. So I thought these key chains might be please both of us.
 
Two of our now "no more minted pennies" represents the year each was born (both 1941), the year they were married, 1963 and a 50cents piece to represent their 50 years together. I tried phoning my bank to get this years mint, but apparently you'd have to special order them...so these I had in my drawer had to do.  I also glued a photo of them onto one of Tim Holtz charms using glossy accents, painted the backside of it and hand wrote March 23 on it.
 
I drilled a hole in all the coins, just big enough for the key chain itself to fit and move freely around.


All the pennies were pretty dark. They were cleaned in a simple household solution of lemon juice and sea salt. I just blopped them all into a little cup, swirled them around, and in a matter of seconds they looked like this. A little polish with a tea towel, and I was happy!

Friday 22 March 2013

Coffee Filter Roses in Blue

I've been busy helping Mom decorate her and Dad's 50th Anniversary party. These are just some of the blue roses I made from coffee filters. Here's my original post on how to make them, using water and paint. Aren't they pretty! I made some leaves  using the same technique too. 
Here's a you tube video: coffee filter roses


Thanks for dropping in. Stay tuned for photos of the Guest Book I made specially for them.
Challenge: Simon Says Stamp : Water

Thursday 21 March 2013

Easter Bunny Green

 
Purchased green chipboard bunny
Spellbinders Oval Florals and Rolled Roses inked in Distress Ink: Milled Lavendar
Martha Stewart punch for ribbon boarder
Cricut cuts eggs embellished with Viva Pens (bunny too)
Computer generated sentiment on the boarder
Green Ribbon for bow
Designer paper and cardstock for the background.
 
Challenge: Simon Says Stamp: Easter/Spring


Tim's Challenge with coffee filters

I'm busy making coffee filters roses for Mom and Dad's big 50th anniversary. I was asked to make one to pin on a little sweater. A little different from the roses that are secured onto a long wire. So with the one simple question of "how the heck do I do that", I thought about Tim's challenge....and that's all I needed to make this:
 
 
 With a couple of coffee filters punched with Tim's Tathered Flowers, a cup of really watery paint and a brush to add some less watery paint to the flower tips.
 
After dunking all the flowers in the died water, and still wet, I added the darker accents. Just lightly touch the edges and you'll see it just bleeds into itself.  Be sure to hold the one flower in your hand as laying it on the towel will affect the absorbency.


 Flower still wet.....A brad holds them together. And add a bit of died water into the center to make it darker


Using the blow dryer on low, I dried the assembled flower. First upside down so the whole thing didn't dry all the way open.


Then from the top now, wiggling the blow dryer all around as the petals all flip and flop about. When they dry they will hold their shape. So blow dry in a way that forms the flowers as you wish them to be.


If you don't like the way it turns out....mist it wet again and start the blow drying again.
 
I added lots of stickle star dusk sparkle after all was said and done, along the edges and center.
My plan is to attached a little pipe cleaner to the back with the end of the brad. Then hopefully it can be pinned onto the sweater. Fingers crossed.
 
 
Simon Says Stamp: Water
 

Monday 4 March 2013

Rolled Roses

 
Cuttlebug embossing folder
Spellpinders Rolled Roses
Martha Stewart leave punch
Ribbon border
Heat Embossed sentiment
 
Challenge: Simon Says Stamp: Anything Goes