plumrose


Sunday 28 October 2012

Inspired by Wendy

Trying to take a good photo of this was really difficult. But here it goes anyways.
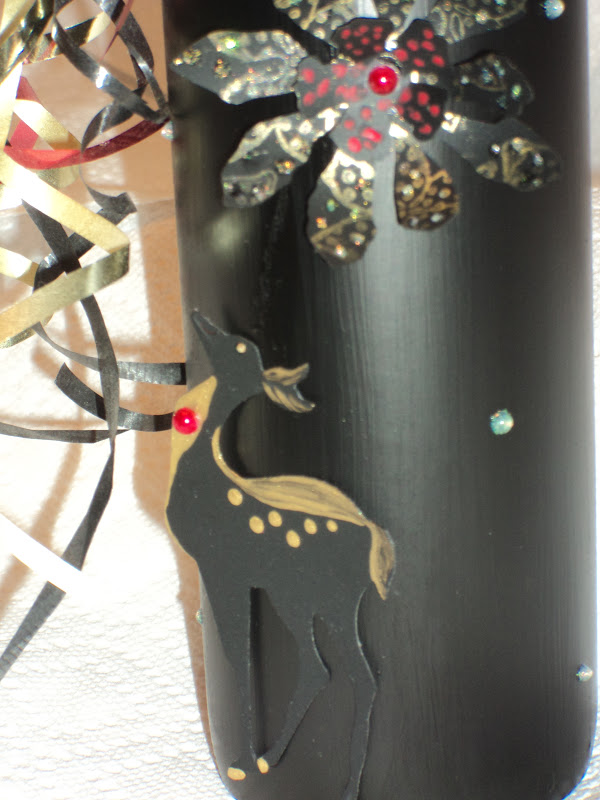
Using the ever fun Wendy Vecchi's Modeling Film on a painted wine bottle. Here I die cut lots of Tim Holtz Tathered Flowers and Reindeer. Decorated the flowers, then applied heat to the flowers. This kinda melts the film, giving you the crafty ability to model it into a shape of your likings. When it cools down, the shape holds. Don't like the way it turned out, simply melt it again and reshape. It's too fun. Here I only shaped the flowers, and only painted the reindeer.


Added some bells, some ribbon and a glittered up a pinecone for the top.


Each flower stamped in gold and painted with red dots


The reindeer also die cut from the modeling film, but I didn't melt this one. Just gave it some shiny gold (photo doesn't show that very well) paint and a bit of bling.
Once I've gone out to restock my Christmas candle supply, I'll be using a black or silver, or gold candle in the top and hang the pine cones with some tinsel ribbon.


Simon Says Stamp Challenge - Studio 490


Friday 26 October 2012

Dylusions surprise - updated

Recently I was at the Scrapfest and got to try out Dyan's Dylusions. I had chosen purple and blue, and was instructed to use a stamp and archival black ink.
Well I went a little heavy on the sprays but continued stamping anyways.
Of course you can't see them very well. When I got home I sat looking at it, thinking -that's so ugly! What can I do to fix it? Crafters can usually find some way of hiding or making the best out of something they don't like...right!!!!
 
So I just started to spray the tag with water. Soaked it to death! The sprays, even tho dried, thined out, moved off the tag. But I just let the tag sit there in it's own puddle, on a paper towel over night. When I woke up, this is what I found....a tie dyed tag!!!!! Kinda pretty.....not saved by any means at this point, but interesting how the dylusions reacted to all that water. Likely the paper towel underneath helped to keep some color pooling underneath or whatever. Anyways...just wanted to share.
 
The portion not tie died is how the tag started out! I didn't soak it at the top.
But look, you can see the stamp! Whoo hoo.....(I'm such a kid!)


Update:
 
I did some more playing, soaked it some more and then built a card around it.
I used matching colored cardstock, a martha stewart punch,  a die cut and alcohol inked, acytate flower as well as a hand rolled flower and 2 different stamps. Ribbon, ribbon, ribbon.
Both sides were so pretty, I just had to keep it a tag/bookmark, and so I built in a little pocket to hold it in place.
 
The final look of it reminded me of some nebula way out in space!


Ornies and Dylusions

This tag I sprayed with red, green and a bit of black Dylusions sprays. Separately I had sprayed another piece of cardstock with red, greens and oranges, and used that to stamp a Hero's Art Ornie. They are heat embossed with Silver Tinsel powder and then cut out and glue dotted onto the tag for dimension. I also stamped the tag with a snowflake, some are embossed with the tinsel powder and some embellished with Gold Perfect Pearls. Also on the corners I emblished with a cuttlebug die cut in green cardstock. The final touches were a ribbon and some gold ink around the edges.


I always to the backside as well....stamped simply with a to: and from: and some gold ink around the edges.


Leafs and Dylusions

Recently I purchased a slew of Dylusions. Now I get to play. They're lots of fun, my fingers get really messy, but the results are fantastic.
 
I sprayed a full sheet of cardstock, with greens and reds, yellows. Once it dried, I stamped the Holly Leaf and clear, heat embossed them right on the sheet.  (make sure the page is completely dry before adding the embossing powder) Then cut around them. Glue dotted them here and there onto a tag which is also sprayed with dylusions (orange, yellow and a hint of green). The ornie is stamped and heat embossed gold, and also cut and glue dotted onto the tag. All the pieces got a bit of stickles to make it sparkle. As well I added a snowflake stamp here and there, and shined it up with some Gold Perfect Pearls. The final touches of a ribbon and some gold ink around the edges.

 
I sprayed the back side of the tag too and just added the same Holly leaf and ornie, stamped and embellished with Gold Perfect Pearls, and a stamped to: and from:


Sunday 21 October 2012

Saturday 20 October 2012

Making my own

Simon Says Stamps asked what your favourite was. Mine is making my own. Flowers are my all time favs. Next to embossing and making my own backgrounds. But recently I purchased Dyan's Dylusions and love... love... love.. it. Which I'm playing with now and will show you soon.
 
For now I'll just share this one:


Simon Says Stamp - Your Favourite

Sunday 14 October 2012

Pink and Brown

Dies, dies, dies. I just love making my own flowers. Here there's 2 different dies to make this 4 layered flower. And another one to make the swirly vines. To add a bit of texture, I ran one of the layers thru the cuttlebug with an embossing folder. And the sentiment frame was cut in the cricut machine.


Entered in the Simon Says Stamp Challenge: Dies and punches


Tie a Yellow Ribbon...

....round the old oak tree! Remember that song? Well I didn't intend on doing the card to represent the song....but rather making the card at last weekends Scrapfest, just happened to remind me of the song. Even then it wasn't until I thought the card needed a ribbon....ha...a yellow one! Who sang that song anyways....anyone remember?
 
This card has lots of layers of acrylic paint on some textured card stock...looks like Brazil paper to me. Some stencils where used and then some stamps and glitter. It didn't turn out at all what was being taught that day. The idea was to leave a real leaf impression. But I got a little behind and missed some of the instructions. Goosssh... I will just have to practice some more at home. :)
 
In the meantime this will be entered in this weeks Simon Says Stamp challenge: Rustification!


Friday 12 October 2012

Bridal Shower Easel Card

 
In the Brides colors: hand made roses, embossing folders, nestabilities dies, leaf punch, designer paper, ribbon, a few pearls and a computer generated sentiment.


Monday 1 October 2012

Autumn Leaves

The leaves are a changing! Love Autumn...it's soooo pretty.
I forgot I added a really pretty bow on the top here, but didn't take a photo afterwards.
And I had bought the window sill die from SSS, but covered it all up with the leaves.
Next time I'll leave (no pun intended) some of it showing.
Must be the effects of the full moon  ;)


Simon Says Stamp - Leaf spiration